
The roof had been remade following the windstorm of ADD NEWSPAPER REPORT AND IN A SECTION. Because of the severe weather hereabouts, the roof was boarded before it was tiled, similarly to Scottish roofs. With the yard nearing completion, work moved indoors. It may seem odd scheduling the outdoor work for January and the indoor work for later in the year. It is odd. But I prefer to work over paving stone rather than through mud. So there. The building of the interiors of the barns had started in 2003 ? and then been suspended. The bathroom walls had been built, the floor had been laid, and the windows and doors put in. Then work stopped for several years. You can see on the left the raw wood panelling. With work conmmencing again, the joists for the ceiling of the bathroom are in place. The first stage inside was to insulate, first the ceiling and then the walls. Back in 2001 ? a windstorm had ripped a piece of corrugated iron, about 20’ by 15’, from the dutch barn which then stood on the field side of the cattle barn, tossed it onto the cattle barn roof and then lifted it up onto the roof of the house. The National Childbirth Trust was holding a branch meeting in the house at the time. The roofer who had done the other barn roof rushed up from the job he was on, climbed to the apex of the roof in a howling gale, and attached a tarpaulin roped to trees in the garden and held down by boulders in the yard, to keep the worst of the rain out. That was Chris Pinder/indar. The roof of the cattle barn was repaired and upgraded, with chipboard sheets , The insulation had to leave a 4” gap between the chipboard and the insulation.
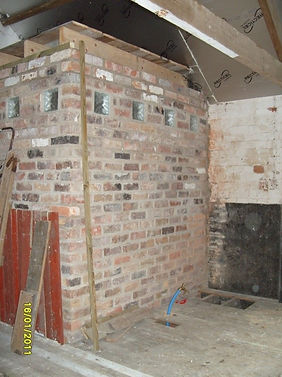
First a wall was built for the bathroom. Though this shows the wall for the bathroom after the floor had been laid on joists with floorboards rewcovered from Fenby's yard up on the Whitby road.


This shows the left hand cottage, with the window to the right in the main room.
I made the windows in the cottages from thingummy pine with solar K glass. I bought a bunch of scaffolding, sufficient to fill one half of the haybarn. Of course, the builder chose to build a tower scagffold and drag it around. A door has been put in and I have made a start on the seating. When the insulation was complete the ceiling and walls were plastered. At this point the edging of the windows and doors and along the seating and across the doorways was unfinished. I had taken a trip up towards Whitby to a reclamation yard and found a load of mouldings and banisters and got them for a good price. Thirty five pounds edges the lot and bannistered more than you will see.

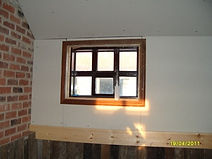
THis shows the right hand cottage, with the window to the left in the main room. The wall mostly insulated around one of the windows. You will see this window again as it develops. The window you see here is single glazed. I neither trust nor like double glazing. Old buildings twist and tumble. Double glazing doesn’t and immediately looks out of place. The building inspector allowed me to make the window frames myself (and they are suitably wonky) so long as I used solar K glass and put in secondary glazing also using solar glass. In the summer the secondary glazing comes out. This job has seen a third inspector come. So far they have been willing to negotiate: add a little here in return for removing a little there. Time will tell if the heating etc work.

In this picture you can see the mouldings above and to either side of the doorway. The dados above the seating are sketched in. Then (and I did warn the builders strongly before they priced for the job that it would happen) I changed my mind and the bit of seating you see to the right of the door came out. The door has one pane of hand made glass. The Bakelite fittings were broken and were thrown away. Wouldn’t it make more sense if before bricks were taken to the council tip the remover had to offer them for sale ? A reclamation yard will leave old bricks n the wind and rain for a few months until the old mortar falls off. Then charge you or me a pound a brick. Modern bricks have a cement and sand mix rather than a cement and sand and lime mix, and the mortar does not come off in the weather. I bought a load of such bricks cheaply then found that out. You live and learn. If we cared enough people would learn to repair such bits as the broken Bakelite. The bit of cupboard you can see to the bottom right comes from my parents first home when they married. Over the years it was demoted to the garage. And now it has been promoted. I will suggest that the MDF units we have in our kitchen will not see sixty years.


THese images show the kitchen area and the main room in the left hand cottage. THe panelling was made from wasts floorboards, with the dao rail running all round the cottage to hold the heating cables and the socket cables.The Charlie Chaplin light came from Ebay and a seller up on the NY Moors.The wall cupboard was from my parents house, where it had been in the garage for my fathers SDIY bits and pieces after having been in their kitchen before it was refurbished. This is the cottage nearest the house, with the area over the passage from the porch tp the field visible (under the Charlie Chaplin lamp) One of the banisters I bought in that job lot has been used with the spokes from some seats that came with a table to create the banister. The Charlie Chaplin leaning on the lamp post came through ebay. In fact most of the lighting came through ebay. In total it cost less than one new pendant light. Then the electrician had to fit an earth wire and the cost jumped. To the left of the picture you can see the frame of the kitchen units emerging. At each step I take a step backwards to think about the next step. It would be lovely to see the finished item in my minds eye and then see it happen. But I do it a step at a time. And go back almost as often as I go forward. Why is the seating fixed in ? Because the cottages are small. A thingummy wall a sleeper wall supports the floor joists and building up that wall over the joists made a support for fixed seating that was tight to the wall. Later on you will find a diagram of the size of each cottage. That cupboard I acquire from my parents is trying out on the wall backing onto the bathroom. The work surface around the sink is an old kitchen table. An MDF work surface fails too quickly for my liking. If this fails it will still look good. The sink is a Belfast sink. You can pick up such a sink in very good condition for £25 or thereabouts. The frame around the kitchen worksurfaces is coming on. The cupboard is from an auction and needed doing up. The electrician has come back in and has started work on the wiring for the sockets and light switches which are all located on the dado which runs round each cottage with the wiring behind. My intention was to make the wiring as simple as possible so that it is obvious where the wires are. In the main house wires run up the wall, under the flooring in the space above, then back down each wall to sockets (at floor level), to switches etc. Likewise the kitchen and bathroom back onto each other to shorten the run of plumbing as much as possible. Heating will be provided by electricity : as holiday cottages, they will not be used much in the colder months and I calculate that it will be cheaper to use electricity for a week or two in the colder months than to install central heating and radiators. (When the time camne to deal with damp on the main house, I removed three radiators in order to put up panelling. I then did not reinstate the radiators. And found that the cost of heating did not fall.)


The cupboards are ????? In the background you can see some old stained glass windows which became incorporated in the cottages. I very much enjoy going to auctions. I run a small second hand book business on the internet and source my stock from auctions. And I pick up other bits and pieces for the cottages. This is an Hygena kitchen from the late 1950s or early 1960s I would guess. Behind you can see a piece of stained glass. I put bits and pieces that i have acquired around the cottages in the hope that i will fin a use for them. In his case ...


Here is the box bed, assembled and in the process of being dismantled to move it and to stain the wood a grey before being reassembled in the holiday cottage.
I have used : old floor planks, kitchen cupboard doors and drawers, some stained glass, upstands from some shelving no longer needed, and two internal doors (at the back of the bed and on their side). The frame is two by two pse.I amn wondering at this stage whether I can use a paliass rather than a mattress. I haven’t quite allowed for the pse in the corners. So some thinking to do.